Power your holiday cookie-baking passion with this enchanting forest gingerbread cookie recipe, inspired by fairytales. No need for special cookie cutters – just a dash of creativity and steady hands will turn this gingerbread cookie into a stunning piece of edible art for your Christmas celebration.
This super easy gingerbread cookie recipe is our holiday favorite due to its rich buttery goodness, mild spiciness, and a hint of ginger, resulting in the perfect melt-in-mouth texture. With this Christmas cookie recipe, you can make your holiday preparations a breeze by preparing a batch of this gingerbread cookie dough in advance; freezing half of it, and enjoying hassle-free baking later.
If you are looking for edible gifts, then share the love with friends and family by gifting these delightful gingerbread cookies during the holiday season. Last year’s success prompted me to explore further, and I introduced an edible holiday gift, Hot Cocoa Mix, which became another crowd-pleaser.

Coming back to this easy gingerbread cookie recipe, which is probably one of the simplest cookie recipes of all time. I’ve replaced molasses with honey for an even more delightful twist. Let’s see what is the ingredients list for this one.
Gingerbread cookies Ingredient
- All-purpose Flour
- Butter
- Honey
- Brown Sugar
- Powdered Spices like Ginger, Nutmeg and Cinnamon
- Egg
- Baking Soda
In case you are baking these Gingerbread Cookies for the first time, do give a read to the tips & tricks that I have mentioned below the recipe card.
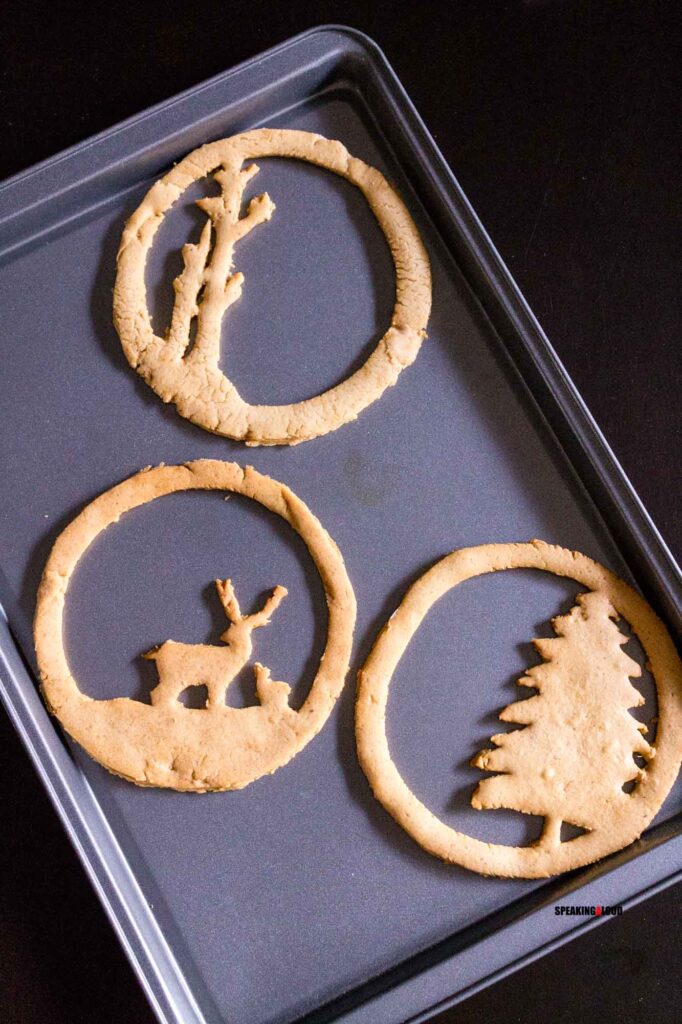
How to make a Gingerbread Cookie Enchanted Forest Scene?
- Place the stencil over this rolled-out cookie dough sheet and slowly carve it out using a sharp paring knife.
- Once done, slide the parchment paper having the cookie on it over a baking tray and bake till done. Similarly, repeat using the other stencils.

- Finally, once the cookies have been baked and cooled, assemble them. I have used a simple icing recipe to decorate the cookies and also to stick them to each other. Once the sugar dries up, it makes the cookies stick to each other like glue works. Find the eggless Icing recipe below.
- Finally, when the cookies are baked, allow them to cool down completely before frosting & assembling them.

If you prefer a flawless look, use a large round cookie cutter for the outer edges. Don’t worry about minor imperfections – handmade with love adds its charm. Decorate with icing to mask any cracks or dust with sugar for a snowy effect.
If you are in no mood to decorate them with icing, you can also dust some sugar to mimic the look of a snowfall.
After allowing the cookies to cool completely, assemble them for a breathtaking final display. Admire your creation – a truly enchanting addition to your Christmas festivities.
Not a fan of gingerbread? Substitute with a butter cookie dough for an equally fantastic result.
More Christmas recipes:
- Christmas Plum Cake
- Eggless Christmas Plum Cake
- Christmas Plum Cake – Mug Cake recipe
- Gingerbread Cookies
- Gingerbread Cake
- Fruit Mince Pies
- Spiced Apple Cake
- DIY Hot Cocoa Mix
- Chocolate-dipped Shortbread Cookies Recipe
Here’s my super simple & easy Gingerbread cookie recipe without molasses.
Have you tried this recipe? I would love to hear about it.
Tag me on Instagram @priyankabhattacharya.sa or Facebook @hashdiaries and I will share it further.

Gingerbread Cookie Enchanted Forest
Equipment
- Convection Microwave Oven
- Mixing Bowl
- Baking Tray
- Parchment Paper
- Pairing Knife
Ingredients
- 3 cups All Purpose Flour
- 1 Egg
- ½ cup Butter At room temperature
- ½ cup Brown Sugar
- ½ cup Honey
- ½ tsp Baking Soda
- 2 tbsp Ginger Powder
- ½ tsp Nutmeg Powder
- ½ tsp Cinnamon Powder
- ½ tsp Salt Use if using Unsalted Butter
- ½ cup Granulated Sugar For icing
- 2 tbsp Lemon Juice
- Water
Instructions
- Mix and sieve the dry ingredients together. Keep it aside.
- Take the Butter in a bowl and whisk it till light & fluffy. Now, add Brown Sugar, Egg & Honey to it. Whisk till everything comes together.
- If this mix looks separated, do not panic. It will come together after adding the dry ingredients.
- Now, add the dry ingredients in batches. Add 1/3rd of it first. Use you hand beater to mix it well.
- Add the half of the remaining dry ingredients and whisk it. It will start becoming tight and difficult to whisk.
- At this stage, dump it on your counter and add the remaining flour mix. Bring everything together with your hands and start kneading gently.
- In a couple of minutes you will have a smooth dough. Wrap it in a clingwrap and refrigerate it for at least 4 hours or overnight.
- When you are about to bake, pre-heat your oven at 170c.
- Take out a portion of your cookie dough. Take a sheet of parchment paper and start rolling the dough into a round disk till you get it ¼th of an inch thick.
- Place the stencil on the rolled dough and cut around its edges. Place it on a baking tray.
- Bake it for 12-14 minutes.
- Once done, take them out and let them cool on a wire rack.
- Make the icing by whisking the granulated sugar with lemon juice. Add water as needed, 1 teaspoon at a time.
- Decorate the cookie and allow them to dry a bit before assembling them. Once they dry, the cookies will stick to each other.


Leave a Reply